HTTP Security Headers and How They Work
Introduction
This whitepaper explains how HTTP headers can be used in relation to web application security. It highlights the most commonly used HTTP headers and explains how each of them works in technical detail.
Headers are part of the HTTP specification, defining the metadata of the message in both the HTTP request and response. While the HTTP message body is often meant to be read by the user, metadata is processed exclusively by the web browser and has been included in HTTP protocol since version 1.0.
In request messages, the metadata can hold the following information:
- Language of the request
- Cookies
- Credentials for the website
- Cache data
In response messages, the metadata can hold the following information:
- Size and type of the content
- Cache storage preferences
- Server data
- Time and date
- Credentials to be set by the client
Security headers are HTTP response headers that define whether a set of security precautions should be activated or deactivated on the web browser.
X-Frame-Options HTTP Header
The X-Frame-Options Header is a security header suggested by Microsoft to avoid the UI Redressing attacks that began with Clickjacking in 2009. It’s supported by all major browsers.
UI Redressing attacks are based on loading web pages inside an iframe and overlaying them with other UI elements. There are various types of UI Redressing, such as hijacking keystrokes or extraction of content, each with its own advantages for attackers.

The Clickjacking attack method works by loading the malicious website inside a low opacity iframe and overlaying it with an innocuous looking button, checkbox or link, which tricks the user into interacting with the vulnerable website beneath. This forces the user to click the apparently safe UI element, which triggers a set of actions on the embedded vulnerable website.

In this example, Amazon is loaded in a low opacity iframe and is therefore not visible by the user. The user sees the Click Here button instead of the Buy button below. When the user clicks on the Click Here button however, only the Buy button on Amazon is actually clicked, which triggers a set of actions on Amazon.
Since these interactions take place as if the victim was intentionally browsing the website, the interaction triggered on Amazon will include the victim’s credentials (such as Cookies) too. (Please note that this scenario is completely imaginary and set in an environment where security mechanisms like X-Frame-Options headers are unavailable.)
How to Prevent Clickjacking Attacks
Clickjacking is an attack that targets users as the weakest link in the online security chain. Multiple methods, such as Frame Busting, have been implemented to protect users from this attack. The most reliable method is the X-Frame-Options header, which was added to Microsoft’s Internet Explorer browsers in 2009.
In order to protect our users from attacks like Clickjacking, the best tactic is to prevent malicious websites from framing our pages to render with iframes or frames. We can use the X-Frame-Options security header to do this.
X-Frame Options Directives
There are three X-Frame-Options directives available:
X-Frame-Options: DENY | SAMEORIGIN | ALLOW-FROM URL
Important Points About the X-Frame-Options HTTP Header
- The X-Frame-Options header must be present in the HTTP responses of all pages
- Instead of X-Frame-Options, the Content-Security-Policy frame-ancestors directive can be used:
Content-Security-Policy: frame-ancestors 'none'; // No URL can load the page in an iframe.Content-Security-Policy: frame-ancestors 'self'; // Serves the same function as the SAMEORIGIN parameter.
While you can whitelist only one URL in X-Frame-Options, with the CSP frame-ancestors you can add multiple URLs that can embed your site in an iframe.
Which Browsers Support the X-Frame-Options HTTP Header?
Like many security features, the X-Frame-Options header was not always available in browsers. Instead the need for such a header became apparent much later. Therefore, not all browsers supported it in their first versions. However, almost all modern browsers support X-Frame-Options, either fully or partially. As mentioned above, the ALLOW-FROM directive isn’t supported by every browser.
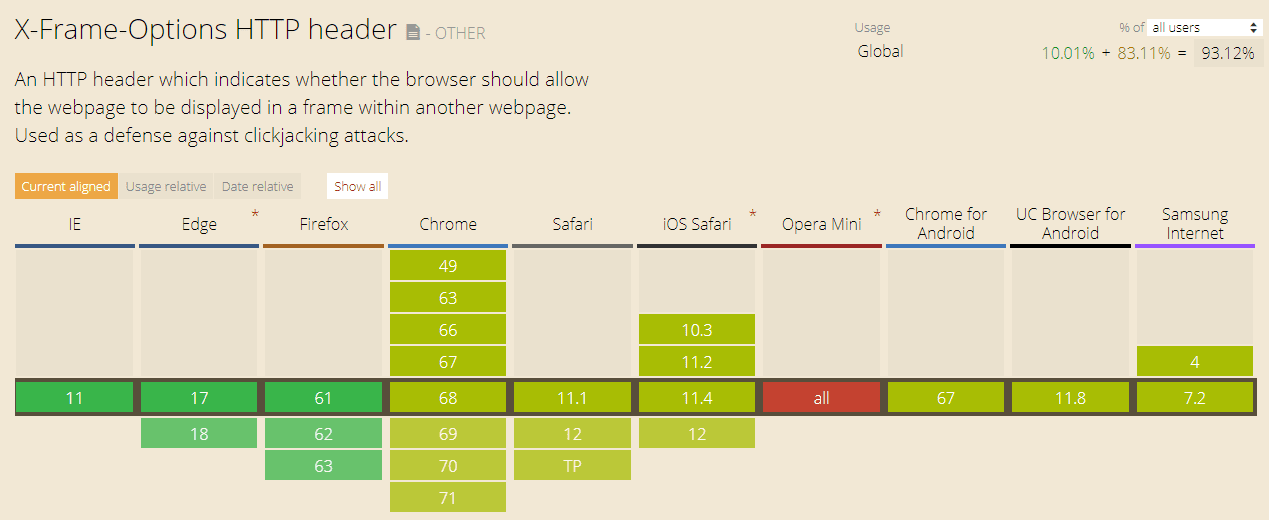
Source: https://caniuse.com/#search=x-frame-options
X-XSS-Protection HTTP Header
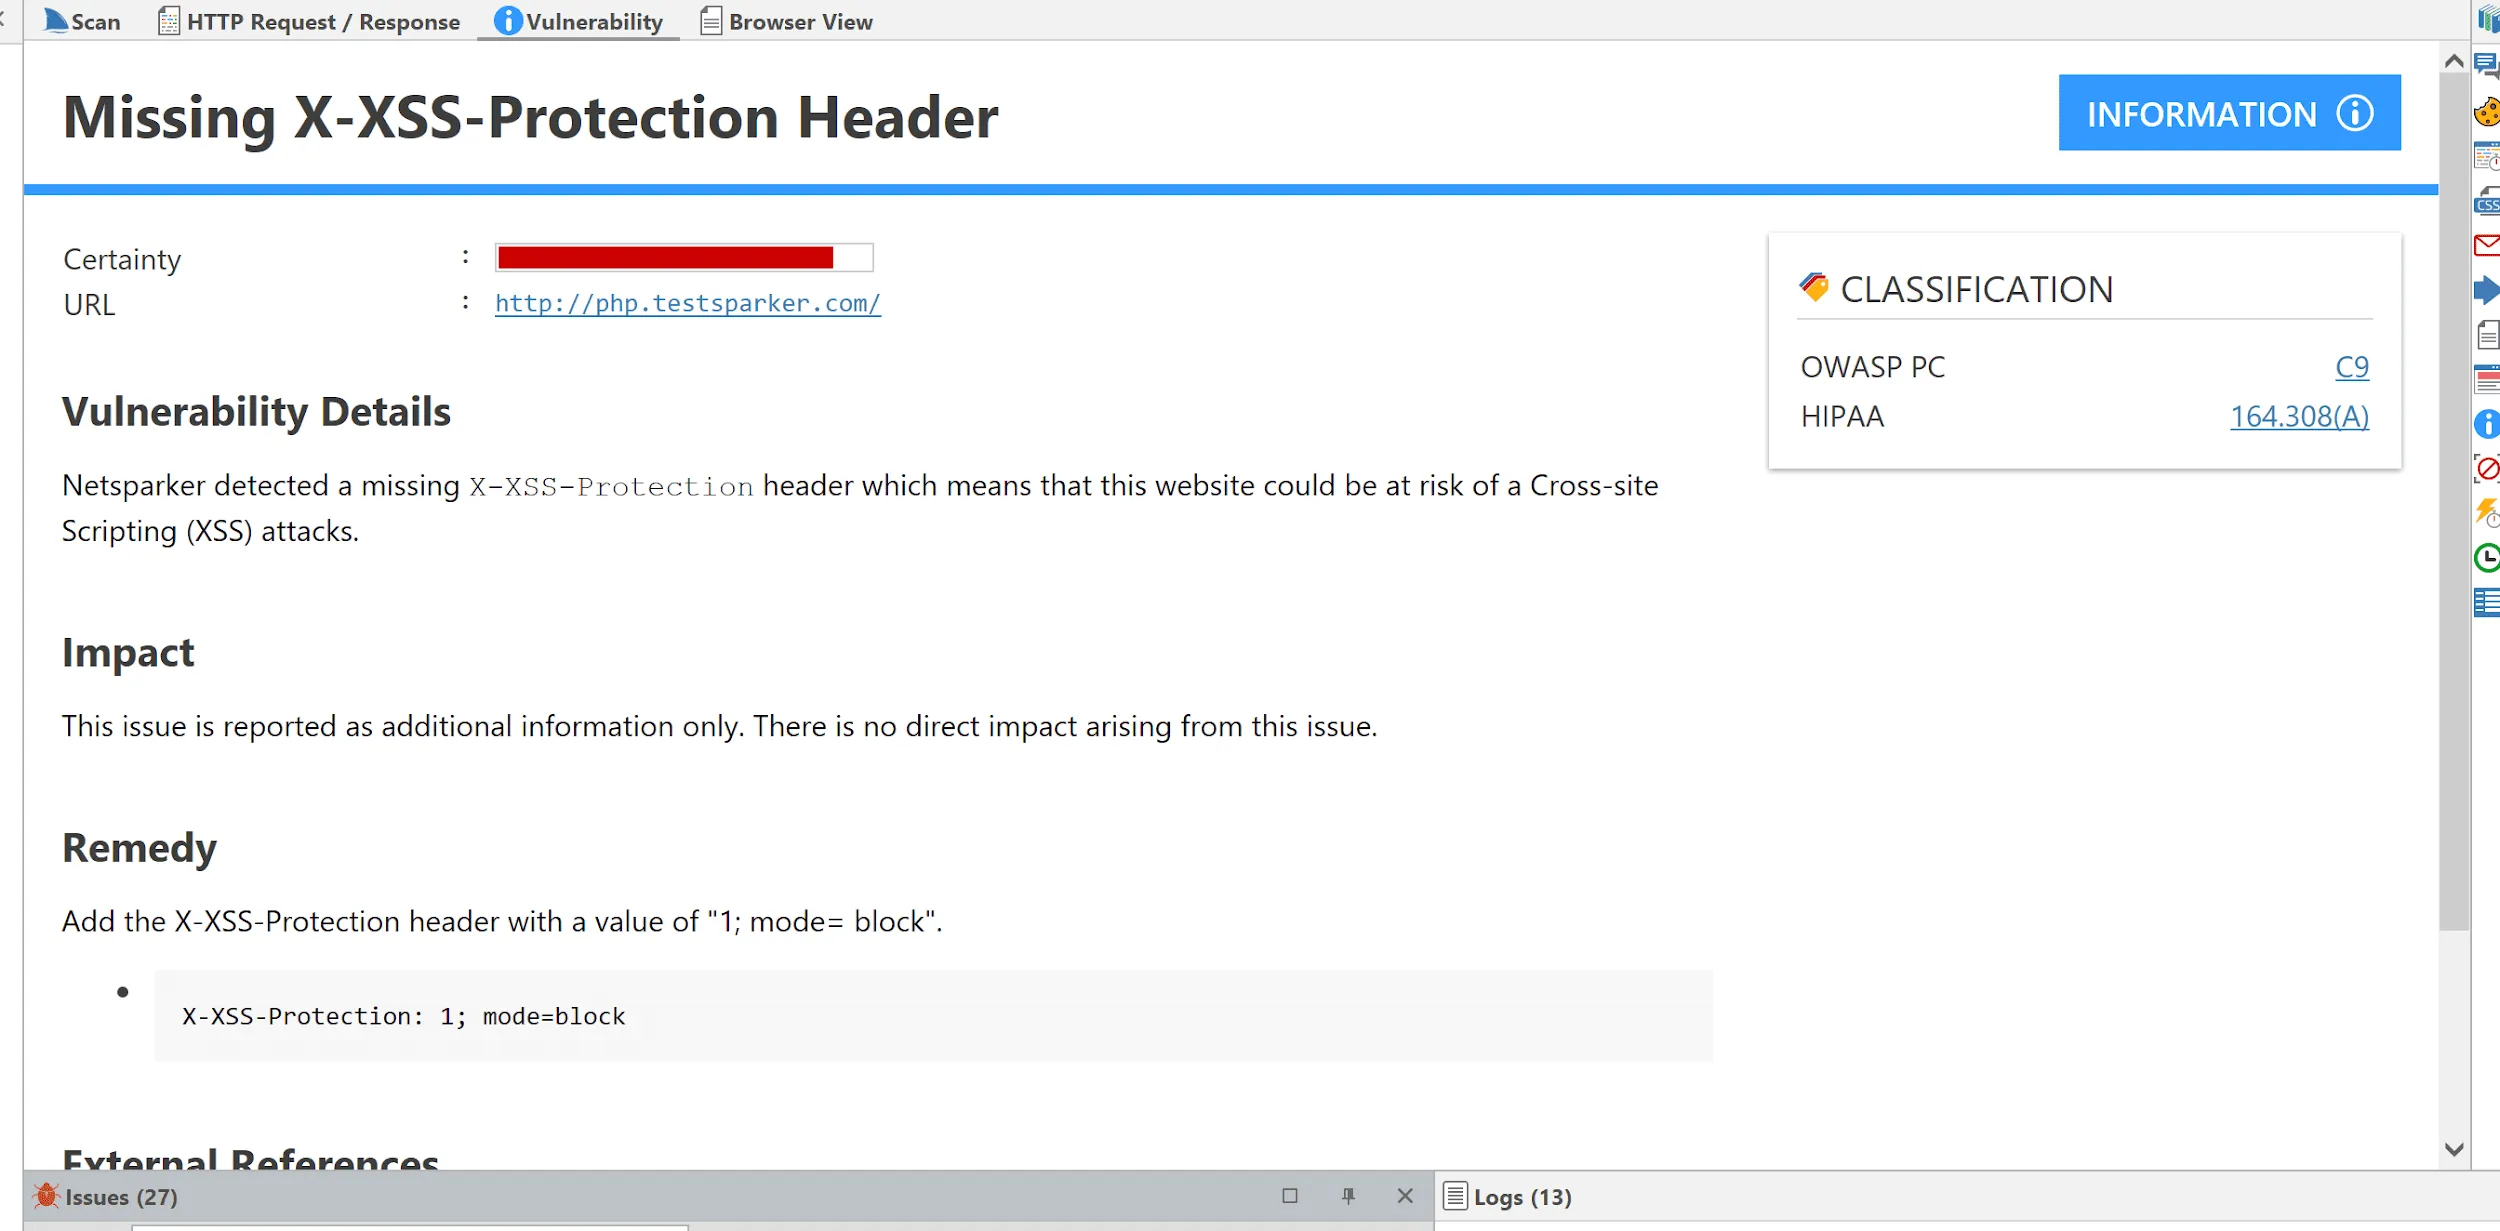
X-XSS-Protection allows developers to change the behavior of the Reflected XSS (Cross-Site Scripting) security filters. These filters aim to detect dangerous HTML input and either prevent the site from loading or remove potentially malicious scripts.

What Can Malicious Attackers Do When Exploiting a Reflected XSS Vulnerability?
Reflected XSS is a vulnerability that arises from the evaluation of user input as script code in the page context.
Malicious actions – such as stealing users’ cookies, tracking keyboard strokes or mouse moves, or issuing requests on behalf of the user – can all be carried out with the help of XSS. This is how it works. Consider the following PHP code:
<p>Welcome <?php echo $_GET["name"];?></p>
By passing the following HTML and JavaScript code to the name parameter, the application will embed it unfiltered on the page, which will display a JavaScript alert window on the vulnerable website.
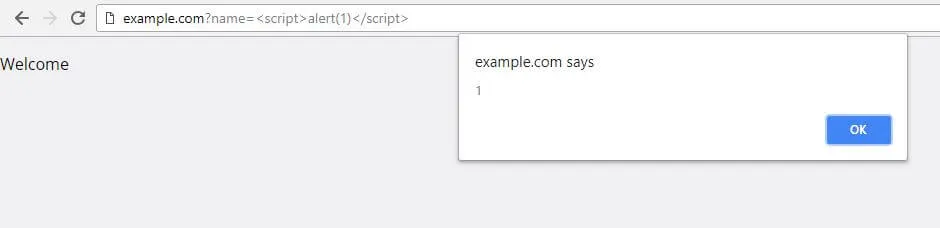
http://www.example.com?name=<script>alert(1);</script>
The Different X-XSS-Protection Header Directives
It is possible to change the behavior of the XSS filter in the web browser by using various directives. In this section we explain what the different directives are and what their purpose is.
X-XSS-Protection: 1
This is the default setting. It enables XSS filtering on the web browser and blocks out potential XSS payloads from being executed on the page.
X-XSS-Protection: 1; mode=block;
This enables XSS filtering in the browser. It avoids potential execution of XSS payloads by blocking the rendering of the page. When the XSS payload is deployed, the visitor gets a blank page on the browser.
In Chromium based browsers, the XSS injection attempt can be reported to the URL specified in the report directive.
X-XSS-Protection: 1; mode=block; report=https://domain.tld/folder/file.ext
The XSS filter is responsible for the detection of reflected script code. It is triggered if potentially malicious HTML code is found in both the request and response on the HTML page. While some directives will instruct the browser to remove the malicious script in question, others prevent the rendering of the page entirely.
For example:
Request URL:
http://www.example.com/?param=<script>alert(1);</script>
Response body:
…
<div>
<script>alert(1);</script>
</div>
However, XSS filters have been abused in the past in order to to block the rendering of parts of an HTML page. Attackers can take advantage of the default behavior of XSS filters that block any potentially dangerous code if it occurs within the URL of the page.

Bypassing the XSS Blocking Mechanism
XSS filters are also used by attackers to disable important HTML and JavaScript code, for example, Frame Busting mechanisms. Recent years have shown that innovative techniques have been developed that can deactivate scripts or steal user data with the help of these filters.
Let’s look at an example of a Frame Busting mechanism. If the developer figures out that the website was loaded within a frame, they can redirect the top window to their website using this code:
<script>
if(top != self) {
  top.location = self.location;
}
</script>
The attacker can bypass this using the X-XSS-Protection mechanism that is active by default:
<iframe src="http://www.victim.com/?v=<script>if">
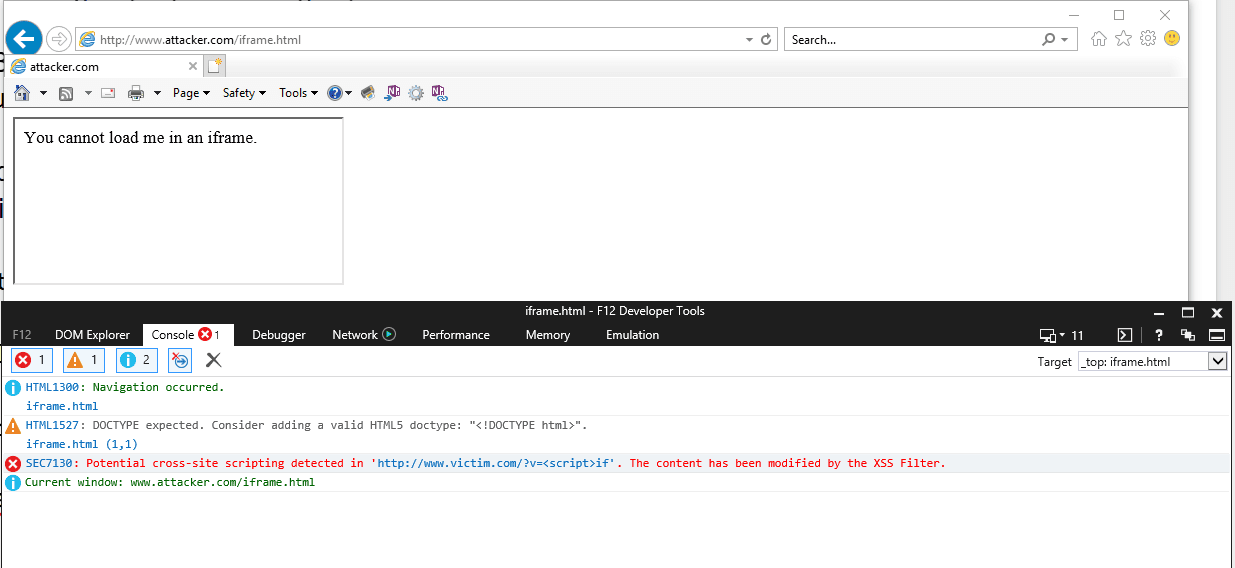
Instead of blocking a Cross-Site Scripting attack, sometimes X-XSS-Protection: 1; (a default setting in Internet Explorer) has been used to bypass the XSS blocking mechanisms. Those vulnerabilities were fixed, but it shows that every feature you add to a browser can threaten the security of end users, even those intended to enhance their security.
Researchers argue that the Content-Security-Policy headers in modern browsers are sufficient to ensure mechanisms like X-XSS-Protection are no longer necessary. Others, however, have suggested that the feature is not secure enough and doesn’t add much value (see the discussion on Bugzilla).
X-Content-Type-Options HTTP Header
This HTTP header is typically used to control the MIME Type Sniffing function in web browsers. MIME Type Sniffing is a content evaluation function used by browsers when the content type is not specified. Basically, if the Content-Type header is blank or missing, the browser ‘sniffs’ the content and attempts to display the source in the most appropriate way.
However, if used in conjunction with an upload functionality, this sniffing process can pose some risks, so developers should be really careful how to use this header. Below is an example highlighting the security risk.
Text File Upload Example
Let’s suppose that a user can upload a text file to a website. If the uploaded file includes HTML, script tags or Javascript code, and we don’t specify a Content-Type as we return it, this is what happens:
- The browser will sniff the content
- Decide that it’s a text/html type of file, and
- Run the code inside
Even the image files that are uploaded to our websites should include the Content-Type header when returned to the user. Otherwise, script and other malicious code could be injected into the metadata of image files (EXIF data) and be executed.
To prevent the browser from sniffing the page’s content and deciding on which MIME type to use, use the X-Content-Type-Options header with the nosniff directive:
X-Content-Type-Options: nosniff
X-Download-Options HTTP Header
The X-Download-Options header can be used download the requested data instead of viewing it in the browser. The X-Download Options header is available in browsers such as Internet Explorer 8 and above.
Therefore it is like an in-depth defense mechanism that is especially suited for applications that allow users to upload content. Below is an example of an attack that this header can help you avoid.
Cookie Theft Example
Let’s imagine a user uploads a file called stealcookie.html to our website. You can use the below header to force the file to be downloaded instead of executed:
Content-Disposition: attachment; filename=stealcookie.html
Though even if we force the download, the user will still be prompted to decide if he or she should download the file or open the file. If the user opts to open the file, the malicious code will be executed.

If the user clicks Open, the file would be parsed by the browser and displayed on our website, enabling the malicious code in the file to access all other pages on the same domain.
The only way to prevent this is to remove the option the user has to open the file by adding the noopen directive to X-Download-Options HTTP header:
X-Download-Options: noopen
When this directive is used, the user can still save and open the file, but this way the malicious code will be prevented from running on our website. Though it will run on the user’s file system.

Content Security Policy (CSP) HTTP Header
Introduced in November 2012, Content Security Policy presents an extra layer of security against multiple vulnerabilities such as XSS, Clickjacking, Protocol Downgrading and Frame Injection. It appears that CSP will become the most significant tool for client side security in the near future, since it provides a substitute for security headers, such as X-Frame-Options and X-XSS-Protection, that aren’t enabled by default.
Here is a sample CSP header:
Content-Security-Policy: <policy-directive>; <policy-directive>
In CSP, we use a whitelist to define rules. With this approach, we can filter out any resources that do not fit with our rules. All we have to do is to state the resources within the Content-Security-Policy response header:
Content-Security-Policy: script-src 'self' https://apis.google.com
This CSP directive allows script loading only over our domain and https://apis.google.com. Any other inline scripts will not run.
Content Security Policy Directives
Along with the CSP header, we can use the following directives to further limit and define the use of resources.
default-src Directive Example
By default these directives are unrestrictive, meaning that if they are not declared in the CSP header, any request will go through. So, if no value is given for style-src, this will be interpreted as style-src: * and styles from all sources will be allowed.
We can use the default-src directive to change this. The specified value will override most directives ending with -src by setting a default value for them. If we define default-src as http://www.example.com and don’t set a value for font-src, the fonts can only be loaded from https://www.example.com.
However, default-src cannot override these directives:
- base-uri
- form-action
- frame-ancestors
- plugin-types
- report-uri
- sandbox
We can add more than one directive in one HTTP header by separating them with a semicolon:
script-src https://host1.com https://host2.com; style-src https://www.example.com
Multiple values for a directive must be separated with a space:
script-src https://host1.com https://host2.com;
One Thing To Keep in Mind When Using Content Security Policy
Define CSP for each page set in the HTTP response. This will help you define the optimal policy for each page and its specific needs.
You can learn more about Content-Security-Policy (CSP) on the Invicti Blog.
HTTP Strict Transport Security (HSTS) HTTP Header
As the name suggests, HSTS is a mechanism that forces browsers to use a secure web connection.
In fact, we can call HSTS the ‘missing link’ in the secure web connection chain. Why?
With end-to-end encryption, SSL lays the foundation for a secure and authorized connection. In an ideal SSL implementation, we can ensure that the data is not altered or monitored by a third party during transmission, or verify that the person we’re communicating with is the intended recipient of the traffic.
I say ‘ideal’ because the partial implementations that some web applications use, such as secure connections only in login and checkout pages, pose a huge threat. The risks that arise with partial implementations are covered in detail in HTTP Cookie Hijacking in the Wild (DEF CON 24 conference).
If we do not force all our pages to be transmitted over a secure connection, attackers can easily forward their targets to surf the web on the unsafe connection or convert the HTTPS traffic to HTTP by launching MITM attacks (such as SSL Strip).
That’s not all. Expired or invalid certificates are highly threatening to your secure connections. Your website’s reputation will also be damaged if your users are confronted with such easily preventable problems.
Is There Any Way to Further Improve HTTPS Protection on Your Website?
If you want to take full advantage of SSL, you have to convert all HTTP requests to HTTPS, and load all images, scripts, style files and other files over a secure connection. You also have to go as far as preventing the user from dismissing certificate errors.
Doing all this manually is rather difficult, especially in case of a certificate error when you have to prevent the user from accessing your website.
Thankfully, the HSTS specification published in November 2012 is the solution to this problem. All we have to do is to set a security header (Strict-Transport-Security) on our web page response. With this security header we can direct our browser to:
- Convert all requests to an HTTPS connection
- In case of a certificate related error such as an expired certificate, prevent the user from browsing the website anyway
- Cache this setting for a specified amount of time
Strict Transport Security Header Example
Here is an example of how to use this header:
Strict-Transport-Security: max-age=31536000;
max-age: This directive allows us to specify the amount of time (in seconds) that the content of the header will be stored in the browser cache.
There are two more significant specifications in the HSTS implementation: the includeSubdomains parameter and the preload parameter. We can enforce the same strict, secure connection on all the subdomains of the website using the includeSubdomains parameter.
First Request and Preload
We can only set the HSTS header over a secure connection. Just like Public Key Pinning (which is another HTTPS security header), HSTS is based on Trust on First Use (TOFU). This means that we have to manually redirect the users, on their first HTTP request, to the HTTPS version of our website. In its response, there will be an HSTS header, meaning that the browsers will store it in their cache. The next time an unsafe (HTTP) connection arises, it will automatically be redirected to a secure connection.
The obvious question is: could a hacker override this first HTTP request with a MiTM attack?
Unfortunately, the answer is yes. However, this time, the HSTS preload list comes to the rescue.
We need to add the preload directive to our HSTS header for the website to be eligible for inclusion in the HSTS preload list. The browser will check whether or not a site is included in the list and will simply refuse to load it over an insecure connection.
Additional Requirements for the HSTS Preload List
Adding our website to the HSTS Preload List has some further requirements:
- You need to serve a valid certificate.
- You must redirect from HTTP to HTTPS on the same host, meaning that the HTTPS traffic for example.com should go through example.com (not through any other domain such as secure.example.com).
- You must support HTTPS for all subdomains, particularly the www subdomain.
- You have to set the following values for the HSTS header:
- The max-age must be at least 31536000 seconds (1 year)
- The includeSubDomains and preload directives must be specified
Strict-Transport-Security: max-age=31536000; includeSubDomains; preload
HTTP Public Key Pinning
In order to understand HTTP Public Key Pinning (HPKP), let’s take a look at how browsers implement the SSL handshake, which is conducted before establishing a secure connection.
When our users try to access our site securely, we send them our public key that both affirms that they are talking to the right party and will be used to encrypt the shared key. We call this a ‘certificate’ and it holds information like our website’s name, certificate expiration date, and the amount of bits in the cryptographic key.
Certificate Authorities and Fraudulently Issued Certificates
There’s one additional piece of information in the certificate. When the browser receives our certificate, it checks if our certificate was signed by a trusted certificate authority (CA). One of the pieces of information in our certificate is the name of the CA, which will be used by the browser to validate our certificate. A secure connection is established once it is confirmed as genuine.
However, several incidents have revealed that, regardless of the motive, one of these certificate authorities can sign a certificate on behalf of a website without notifying the website owner!
- One example of this occured in the Netherlands in 2011 when the authorized certificate distributer DigiNotar was hacked. Around 500 certificates were fraudulently signed. Multiple Google services, including 300,000 Gmail accounts belonging to Iranian citizens, were monitored with these certificates.
- A similar incident took place in 2008 and 2011, affecting a certificate authority called StartCom. Certificates for paypal.com and verisign.com were published. In 2011, attackers accessed the root key of StartCom, gaining the ability to produce, invalidate, or renew any StartCom certificates.
- In 2011, due to an incident with a certificate authority called Turktrust, an intermediate certificate was issued to sign certificates on behalf of Google domains. One of them was spotted on December 26, 2012 by Google Chrome, and subsequently reported to Google. It’s noteworthy that the Chrome browser figured this out and reported it back to Google.
How to Prevent Fraudulently Issued Certificates
The question is: How can a browser automatically detect a fraudulently issued certificate for a specific domain and even report this certificate back to Google?
The answer to this question is a mechanism called HTTP Public Key Pinning (HPKP). Ever since the introduction of this feature in Chrome 13, websites can make their certificate fingerprints (hash values) known to the browsers using the Public-Key-Pins response header.
Browsers store these hashes on the user’s computer. Every time the website is visited, the browser generates a hash based on the certificate’s public key. If the hash doesn’t match the stored value, the connection won’t be established, and the incident is reported to a URL if the report-uri directive is set.
In conclusion, HTTP Public Key Pinning protects the users and websites from CAs signing fake certificates.
Setting up an HPKP Header
Public-Key-Pins is a security header. We can enable HPKP by sending it back with every response over a secure connection (HTTPS):
Public-Key-Pins:
pin-sha256="d6qzRu9zOECb90Uez27xWltNsj0e1Md7GkYYkVoZWmM="; pin-sha256="E9CZ9INDbd+2eRQozYqqbQ2yXLVKB9+xcprMF+44U1g="; report-uri="http://example.com/pkp-report"; max-age=10000; includeSubDomains
HPKP Directives
Various directives are available for the HPKP header, such as max-age and report-uri. This is a complete list.
You can set the HTTP Public Key Pinning mechanism to work in Report-Only mode, which means the browser will still establish a secure connection if a mismatch occurs, but will report the breach to the URL stated in the report-uri directive:
Public-Key-Pins-Report-Only: pin-sha256="d6qzRu9zOECb90Uez27xWltNsj0e1Md7GkYYkVoZWmM="; pin-sha256="E9CZ9INDbd+2eRQozYqqbQ2yXLVKB9+xcprMF+44U1g="; report-uri="http://example.com/pkp-report"; max-age=10000; includeSubDomains
According to RFC 7469, you must set at least 2 pins. One is for your current certificate, and the other is for your backup certificate. The given set of Pins contains at least one Pin that does not refer to an SPKI in the certificate chain. (That is, the host must set a Backup Pin; see Section 4.3.)
Research published on EvenPaths concludes that there are HPKP implementation errors, even in webpages belonging to large companies such as Facebook and WhatsApp. This information was collected using the Alexa Top 1 Million domain list. And while there are websites that did not pin any certificates in their HPKP headers, there were also websites that pinned as many as 17.
Which Browsers Support PKP Security Headers?
After reading the above about HPKP, get ready for a little surprise… Starting with Google Chrome version 69, HPKP – the mechanism that helped Google to catch fraudulently issued certificates in the wild – is no longer supported.

Source: https://caniuse.com/#search=Public%20Key%20Pinning
Even though this is a little surprising at first, it makes sense if you think about it. If even well resourced companies such as Facebook (as outlined in the ElevenPaths study) make mistakes in implementing this security measure, it’s probably too complicated to be used reliably on a large scale.
However, there is a header that promises an equal amount of protection, with a little extra effort.
Expect-CT HTTP Header
The header that will eventually replace HPKP is called Expect-CT. Even though HPKP was a useful security feature, it by far wasn’t the only way to detect certificates issued by rogue CAs or to prevent them from doing so. With security mechanisms such as Certificate Authority Authorization (CAA) and Certificate Transparency, we can still be notified of certificates issued on behalf of us without our permission or knowledge and in some cases even prevent CAs from issuing these certificates altogether.
But how would these protections work and can they really replace HPKP?
Certificate Transparency Logs
The answer is Certificate Transparency (CT). That’s the reason why the security header we are going to talk about is called ‘Expect-CT’ (in other words ‘Expect the certificate to be submitted to a Certificate Transparency Log’).
These Certificate Transparency Logs are publicly accessible and therefore administrators can check them and search for their own domains. If there is a certificate issued for their domain without their prior knowledge or authorization, they can immediately take steps to protect their users.
Of course CAs aren’t motivated to add more complexity to the already heavily regulated process of signing certificates. This is why Google, as the developer of one of the most popular browsers, had to put its foot down and make the CT log mandatory for new certificates issued from April 2018.
How CT Logs Work
Let’s have a quick look at the Certificate Transparency log mechanism. CAs, by design, have to submit each issued certificate to this log. There are three parts that need to come together in order for CT to work:
- Submission of the certificates to logs, which is the task of CAs
- Monitoring the logs
- Auditing, which is done by built-in auditors in browsers
In addition, it is advised that site owners add the Expect-CT header to their responses. Browsers decide whether or not the certificates presented to them follow the outlined rules or not. Along with the certificate, browsers check the Signed Certificate Timestamp (SCT). This data contains the timestamp of when the certificate was logged. The browser uses the SCT information to check if the outlined conditions are met.
Where is the Risk?
If we have a certificate issued for our website before the obligatory start date of April 2018 in Google Chrome, and the expiration date is set 10 years ahead, Google cannot enforce the certificate transparency rules. Otherwise, this would result in a large amount of perfectly valid certificates that are no longer usable, even if they were issued before CT was invented. Since HPKP is deprecated in Chrome, there would be no way of being notified of an illegally issued certificate for our website.
However, if we set and enforce the Expect-CT header and use max-age to cache this directive in the browser for a while, during the connection to our website, certificates that do not meet the CT requirements will not be accepted even if they are signed before April 2018. This way, we eliminate the risk of older certificates being determined to be valid without our knowledge.
How Do We Implement the Expect-CT Header?
First we have to make sure that our current certificate supports CT. We can do so by generating an SSL Labs report:
https://www.ssllabs.com/ssltest/analyze.html?d=invicti.com
Next we can activate the Expect-CT header in the HTTP response by using a header as below:
Expect-CT: enforce,max-age=30,report-uri="https://ABSOLUTE_REPORT_URL"
The Expect-CT header has three directives:
- max-age: This is the duration (in seconds) of the data being stored in the browser cache.
- report-uri: This is the URL to which the breach report will be sent. It must be an absolute URL (e.g. https://example.com/report) not a relative one (e.g. /report).
- enforce: This indicates whether the connection should be established, if a certificate that doesn’t comply with CT is present.
You can also use this in report-only mode which doesn’t initially enforce the CT requirement.
Expect-CT: max-age=30,report-uri="https://ABSOLUTE_REPORT_URL"
If everything is as expected, you can then choose to enforce.
Expect-CT: max-age=30,report-uri="https://ABSOLUTE_REPORT_URL", enforce
Referrer-Policy HTTP Header
Referer is a request header that is confusing on multiple levels. First of all ‘referer’ is misspelt. (The correct spelling is ‘referrer’.) Even though this is an amusing fun fact, it also shows just how hard it is to even correct a simple mistake such as a missing ‘r’ in an HTTP header field. Just imagine how much harder it would be to correct a critical security vulnerability in a widespread protocol!
But the misspelling is not the only reason why this header is often not properly understood. Let’s take a look at how this header works.
How the Referrer-Policy Header Works
You are the owner of website A and you want your visitors to check out website B. You do this by placing a hyperlink to Website B on your homepage. If users click on the link, their browser will automatically add the Referer header to the request headers. It’s content will be the address of website A. This has the advantage that Website B can see who linked to their site just by checking the Referer header of each incoming request. The Referer header will be added to requests made for style, image, script loads, and form submissions. The request would look like this:
GET / HTTP/1.1
Host: B.com
Referer: A.com
You might want to hide the information in the Referer header for multiple reasons, such as security and privacy.
As a response header, Referrer-Policy gives you the following options to help control the Referer request header. Note how Referrer-Policy is written with a double r (rr). Arguably, this just adds to the Referer/Referrer spelling confusion even though it’s the correct way to write it.
The Referrer-Policy header can be set up in HTTP response messages as follows:
Referrer-Policy: no-referrer
Referrer-Policy Directives
Here are all potential values the Referrer-Policy header can send.
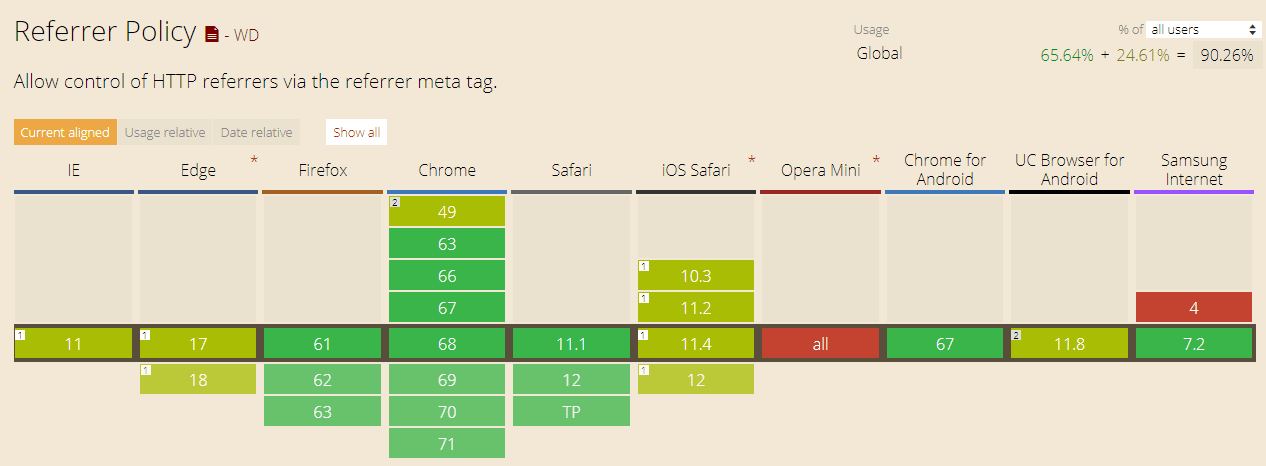
Which Browsers Support Referrer-Policy Security Header?
Yet again, this header is not supported equally well in all modern browsers. In the image below you can see which browsers fully support Referrer-Policy and which don’t. For further information, visit the link below the image.
Source: https://caniuse.com/#feat=referrer-policy
Proactivity is Vital!
Security nowadays, contrary to popular belief, is not a defensive art. It is mostly the art of preempting your challengers’ moves and being able to plan ahead. Security adversaries are more creative than ever, revealing new tactics every day. Thanks to HTTP security headers, it is possible to be a few steps ahead, ensuring the security of our sites, our users and our data.
Authored by Ziyahan Albeniz
Reviewed by Sven Morgenroth
Translated by Umran Yildirimkaya